Your Site's Calling Card
Five Ways to add `og:image`s to your JAMstack site
Note: this tutorial is now out of date - I don’t pre-generate og:image cards anymore as it added too much time to my builds
🎉This blog now offers RSS and proper og:image cards!

It’s relatively easy to implement RSS with the rss package on npm, but no such library exists for image generation. It’s worth discussing the state of the art and how you can do your own.
What is og-image?
OpenGraph is an informal set of protocols first introduced by Facebook in 2010 to offer a small set of metadata that its robots could consistently scrape to present in its feed and search algorithms. These are implemented as meta tags:
<html prefix="og: http://ogp.me/ns#">
  <head>
    <title>The Rock (1996)</title>
    <meta property="og:title" content="The Rock" />
    <meta property="og:type" content="video.movie" />
    <meta property="og:url" content="http://www.imdb.com/title/tt0117500/" />
    <meta
      property="og:image"
      content="http://ia.media-imdb.com/images/rock.jpg"
    />
    ...
  </head>
  ...
</html>
While SEO experts obsess over title, description, category, and other tags, images are harder to implement and less directly linkable so they may not receive as much attention. I’m not an SEO expert, so I’ll refrain from explaining further, but I’ll end by noting that OG tags have been coopted by Twitter to do Twitter Cards, and then used by Slack to do “unfurls”, leading to a de facto standard of a mush of tags relied upon by every Internet media platform that does unfurling (which at this point, is everyone, right down to your texts and DM’s in WhatsApp).

It’s obviously important to have the right OG tags for the right pages, so there is some investment in every framework to manage tags right. React has react-helmet (there is an async version for SSR), Vue has vue-meta, Angular ships with the Meta class, and Svelte ships svelte:head. They all work the same: using the DOM hierarchy to establish specificity and therefore priority.
Why og-image?
A picture is worth a thousand words, and in today’s attention spans and media, they may present the only glance people give to your work before moving on to the next thing. I said this on Twitter recently:
I’ve started caring a lot about OpenGraph images. If you want your content to spread via social media (including Slack, not just Twitter/FB/etc), this is THE FIRST THING newcomers to your blog see, not your actual blog. Spend the 0-2hrs sorting it out.
I guess I don’t have much more to add than that. og-images aren’t just for blogs and news sites, they’re your viewers’ first port of call for virtually everything from ecommerce inventory pages to landing pages.
Apart from showing that you care about how your brand presents, you are also likely to get more attention via social media ranking algorithms and just plain adding noticeable color and taking up more space in a timeline. Not a bad investment if you intend your site to stick around for a bit!
What’s more, you probably know that this game is being played on you. But you can’t help it; it works anyway!
Five Ways to og-image
The Lazy Way: Same Image for Everything
This method is simplest and will always work: Just pick one image that represents your site, and use it everywhere. On every page, regardless of the content. This way your og-image will always be available, with no work needed by computer or human to make sure it is available.
Some great use cases for this are literal single page sites, where all your content is literally on the one page, for example for this conference:
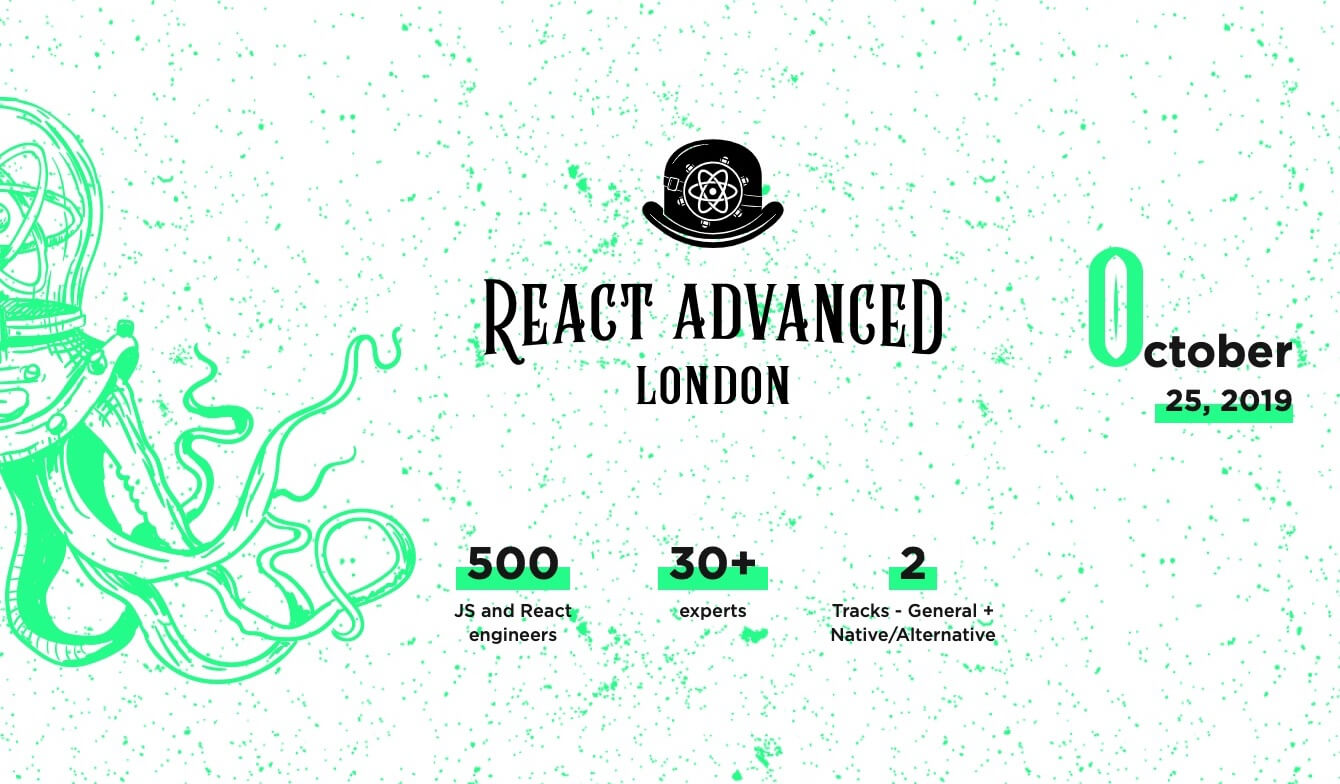
Here the goal is very clear - some basic information about what it is, what you get, and the date, together with the visual branding. Very clear.
However, apply this to a blog, or an ecommerce page, and you start to look lazy. People catch on very quickly that the image is the same everywhere, and you lose the opportunity to offer more information about your product or article or talk.
Still, no matter which of the below strategies you pick, this is a good fallback strategy if others don’t exist.
The Hard Way: New Image for Everything
Some themes, templates and platforms, like those available with Medium and Ghost and Wordpress and NetlifyCMS, can force you to manually pick images every time. This sets up a 1:1 relationship between every image and post, and usually offers some personalization.
While this can be nice, it greatly increases the hosting considerations and activation energy of your content creation, because now you are in the image hosting business as well, not to mention doing the manual work of picking images each time. Hosted platforms love this, because it makes your site that much harder to migrate away.
Image picking has gotten a lot easier with the royalty-free ease of Unsplash, which has an API that every platform now offers to make this task easier.
However, the ease of use detracts somewhat from the intent of using og:images in the first place - establishing a consistent visual identity, and conveying more information than an image that is vaguely loosely associated with some word that has some distant relationship to do with your content. If you’re writing heavily technical content, or a focused series of articles, you may struggle to find fitting images.
Plus, lets face it, everyone can spot a stock photo from a mile off.

So, some people, like me, explore dynamically generated post images.
The logic has a nice parallel: after all, if we are generating our pages from data, can’t we also generate our images from data too?
Generate on Request
The easy way to do this is to use Zeit’s Open Graph Image as a Service program. You can fork and deploy their code on Zeit, which gets you a nicely designed and fast customizable serverless service complete with a preview UI! The result then gets cached, so your serverless bills don’t break the bank.
The program basically uses Puppeteer and Chromium to compose images and text in HTML, CSS, and JavaScript, and serves the screenshot:
![]()
This is a wonderfully creative way to handle this problem and it works great for the Zeit properties. I would certainly recommend this for projects already using Zeit and Next.js. (As you’ll see, the next two solutions are really just basic variations on this one.)
The extremely dynamic capability of this service is wonderful, but most of the time you just need a good enough image, at one or a few sizes, at the right aspect ratios (2:1), and don’t mind trading off a little less dynamism for smaller API surface area…
Pregenerate On Build
Many static site generators like Gatsby do their image processing at build time, which makes it easy to stick this image generation step in at that point. When you serve a pregenerated image file, there just isn’t any security concern and it can be cheaper and faster, as well as more tech agnostic as it doesn’t require a running server and api setup! (This is the core idea of JAMstack.)
Andrew Ingram wrote a fantastic summary of his approach for his beautiful, stylized cards:

It’s really worth a read! In particular, note the coda that much of this functionality can be had with the gatsby-remark-social-cards plugin.
However, this solution doesn’t work outside of Gatsby, and I also can’t shake the feeling that I shouldn’t need to muck around with GraphQL just to create cards from what is essentially a sitemap.
Generating the images is an expensive/slow process, especially with Gatsby’s sharp transform, and to do it on every build also seems wasteful, especially since most of these images should stay the same from build to build. I recall that working on the image heavy Gatsby docs site used to take over 45 minutes for a build (this was a long time ago, in Gatsby v1, it should be faster today). This is expensive both in terms of build server cost as well as developer time.
Pregenerate Once
I saved the best (😂) for last, but by no means am I suggesting my implementation is the ideal expression of this idea. The basic gist is that if shifting work from repetitive runtime work to build time is a good idea, then maybe shifting repetitive build work from build time to write time is good too!
It turns out you can write a screenshot engine in something like 20 lines of code:
const puppeteer = require('puppeteer')
const path = require('path')
module.exports = async function screenshot(PostArray) {
  const browser = await puppeteer.launch()
  const page = await browser.newPage()
  page.setViewport({ width: 1200, height: 628 })
  const getHtml = require('./template')
  for (const post of PostArray) {
    const [slug, text] = post
    const html = getHtml({
      text,
      fontSize: Math.min(20, Math.max(7, Math.floor(100 / text.length))) + 'vw'
    })
    await page.setContent(html)
    const filePath = path.resolve(`static/og_image/${slug}.png`)
    require('./ensureDirectoryExistence')(filePath)
    await page.screenshot({ path: filePath })
  }
  await browser.close()
}
Some notes on this approach:
- the key to developing your template is launching puppeteer with
headlessmode turned off (it is on by default!). This way you can develop your CSS with the browser devtools inside the puppeteer window. - The text that you have to render can range from “short words” to “extremely super long califragilistic long words” and if you are pregenerating then you won’t really have time to adjust the font size to make it look right - the approach I settled on is to put a range on the font size between 7 and 20
vwunits, and letting it wrap around. This doesn’t solve all cases, but is good enough for most of them. I feel like more work can be done with text measurement to achieve a better solution for this.
I was then able to hook up this function into my RSS feed generation on the basis that the RSS feed should be the source of truth for which slugs and URL’s I need to generate images for. This one line can be easily commented out for the most of the time that this isn’t needed. In future, this workflow can be adjusted to be automated given a reliable incremental build system, but it will do for now.
Finally, for one-off calls and index pages that are a special case, I wrote a small 5 line CLI that hooked into the screenshot function to generate the final few images I need.
More than just a couple hours
Having done this a couple times now, I will confess that it does take more than a couple hours to do right if you are rolling your own system and don’t have convenient, existing plugins to work with for your framework. Truth in advertising! Although I feel that this process would be helped a lot more by having a CLI-and-library for doing these templates and screenshots. I’ve made the beginnings of one in this project - if you’re keen on extracting this to be a reusable library, get in touch!
More things others have done based on replies:
- Social generator
- puppeteer-social-image
- puppet master hosted service with saasify
- https://www.npmjs.com/package/gatsby-plugin-printer
- Validate your Twitter ogdata https://cards-dev.twitter.com/validator